Construction - The Emergency Heating Stove
The Mad Housers stove is simply and cheaply made, yet puts out a surprising amount of heat. Properly used and maintained, a stove can last for a couple of years or more.
Safety note: Since the wood-burning stoves are meant to be used inside a wooden hut, care must be taken to keep the stove from touching or getting too near the walls and floor. The stove shield shown here both keeps the hut safe from fire and reflects heat into the hut, reducing fuel use; however, if a 55 gallon drum is unavailable, bricks can be used instead. To use bricks, make a layer of brick on the floor corner where the stove will sit, and stack bricks along the walls to the height of the stove, about 2 feet high. Always include a fire extinguisher when providing a stove to a hut.
Step 1: Materials + Tools
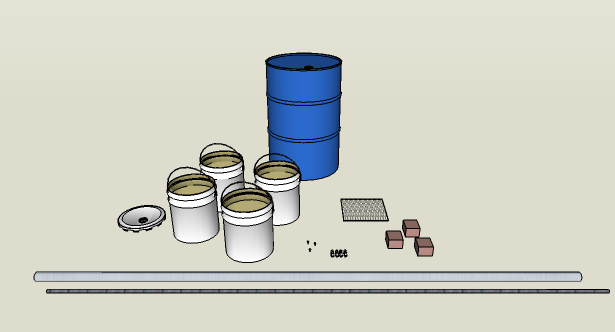
Materials
All quantities are for one stove and stove shield
- 1 55 gallon steel drum, closed top preferable (makes 2 shields)
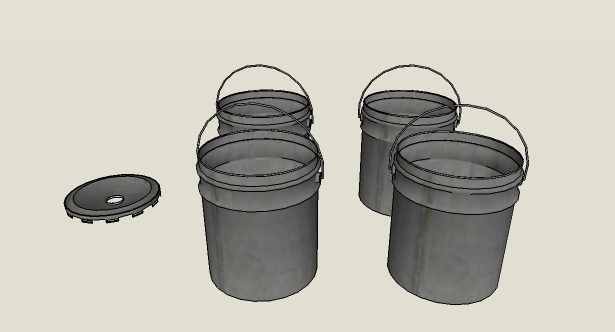
- 4 5 gallon heavyweight steel shop buckets
- 1 steel shop bucket lid, "Rielke" opening
- 1 10' 2" diameter electrical metal conduit pipe
- 1/4" bolts, 8 per stove
- 3 #8 self-tapping metal screws
- Heavy-duty expanded sheet metal grating, preferably stainless steel, 1'x1'
- 3 half bricks
- 1 10' length of rebar
Tools
- Electric drill, with 1/8" and 17/32" metal-grade drill bits
- Circular saw with metal-cutting abrasive blade
- Vise grips or heavy pliers
- Metal file
- Poker, tongs, or other tool for handling things in a fire
- Heavy gloves, goggles, and earplugs
- Tape measure
- (optional) Jigsaw, with metal-cutting blade
Step 2: Burn off paint
Start a fire outdoors in a large, enclosed space or container - you can use the 55 gallon drum as a fire barrel for this step. The fire is to burn off the paint from the buckets. This is necessary to guarantee a snug fit when nesting the buckets together; otherwise, the first few times the stove is used, the paint will burn off then - and the buckets will have a gap where the paint used to be, leaking smoke.
Once the fire is going well, put the buckets in the fire. This'll take a couple of minutes per bucket; you can have more than one bucket going at a time, however.
Safety Note: Fire is hot. Smoke from burning paint is nasty and poisonous. Don't pull the buckets out by hand; hook them out by the handle using the poker. Don't stand around inhaling the smoke. Wear gloves.
Toss the lids in the fire. This'll melt the plastic off the pour spouts, leaving the hole on top where the stovepipe will go. You can hook it out by the hole once they're done.
Use paper towels or old newspapers to wipe the soot off the buckets and lid before proceeding to the next step.
Step 3: Cutting
Safety note: This step produces lots of flying sparks and noise; goggles, gloves and earplugs should be used.
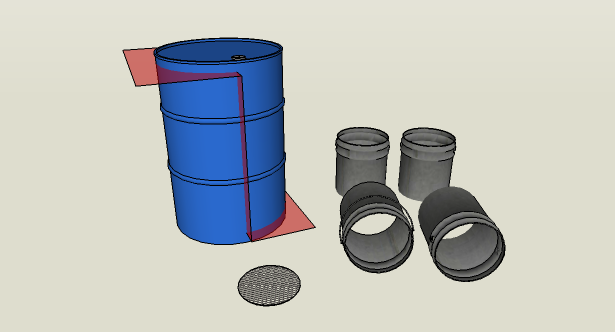
Use the circular saw with the metal grinding blade to remove the bottoms from two of the buckets. Remove the handles from all of the buckets except one of the bottomless buckets. The end result should be a bucket with no bottom and a handle, a bucket with neither handle nor bottom, and two buckets without handles but with bottoms.
Cut the grate into a circle to fit inside the buckets. You can use spraypaint and a bucket bottom to mark the circle on the grate before cutting. A jigsaw with a metal-cutting blade is easier to work with for this task than the circular saw, but the circular saw gets acceptable results.
Ten foot stovepipes can sometimes have problems fitting through huts with narrow or constricted doors. A stovepipe can have up to 18 inches taken off the top safely.
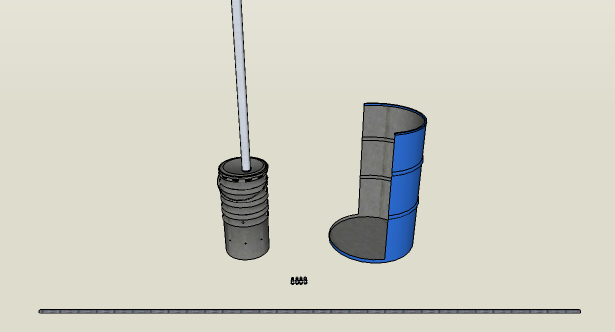
To make two stove shields from a 55 gallon closed-top drum, use the circular saw. Laying the drum on its side, cut halfway around the circumference of the barrel about an inch below the top of the barrel. Next, cut a similar line an inch above the bottom of the barrel, but on the opposite side of the barrel from the first cut. Finally, cut two vertical lines connecting the semicircular cuts. This will result in two stove shields.
Safety note: The edges of the stove shields will be sharp! Use a metal file to dull the edges, and wear gloves.
Step 4: Drive screws
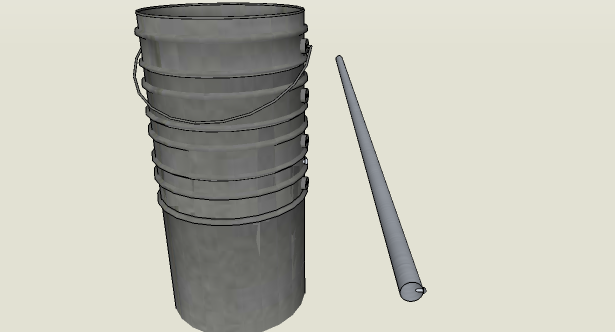
Nest the buckets. The two buckets with bottoms go on the bottom, the bottomless bucket without a handle goe in the middle, and the bottomless bucket with the handle goes on top. Drill the self-tapping screws just below the lip of the bottommost bucket on opposite sides, which will join the buckets into one unit.
Tip:Sometimes the screw folds the innermost bucket instead of punching through. It's important that the screws go through every bucket; back out the screw, push in the fold, and try again.
Screw in another self-tapping screw about an inch above the bottom of the electrical metal conduit pipe. This screw serves to keep the stovepipe from dropping to the bottom of the stove.
Step 5: Drill and assemble
Drill eight holes equally spaced around the circumference of the stove, 5 inches above the bottom, using the 9/16" bit.
Using the vise grips, go around the rim of the hole of the lid, where there's a steel reinforcement ring. Squeeze the lip of the ring flat - this will both give the stovepipe enough room to get into the hole and add some strength to the lip.
Place the bricks in the bottom of the stove, and the grate on the bricks. The vent holes should be above the bottom of the firebox and below the grate. The lid is now the stove top, and the stovepipe sits on the lid's reinforced ring.
You now have a stove. The bolts are used to damp the fire; for a hotter fire, remove bolts from the holes around the bottom to let in more air, and to damp the fire, insert them into the holes.
Safety note: Since the chimney is only 2 inches in diameter, it is critical both for operating efficiency and for safety that the stovepipe is kept clean. The rebar is provided as a tool for cleaning the stovepipe.
